Wednesday, 25 February 2015
Saturday, 21 February 2015
CyberARTS Weekly blog post #3
CyberARTS Weekly blog post #3
Creative recordings-The Daily Create
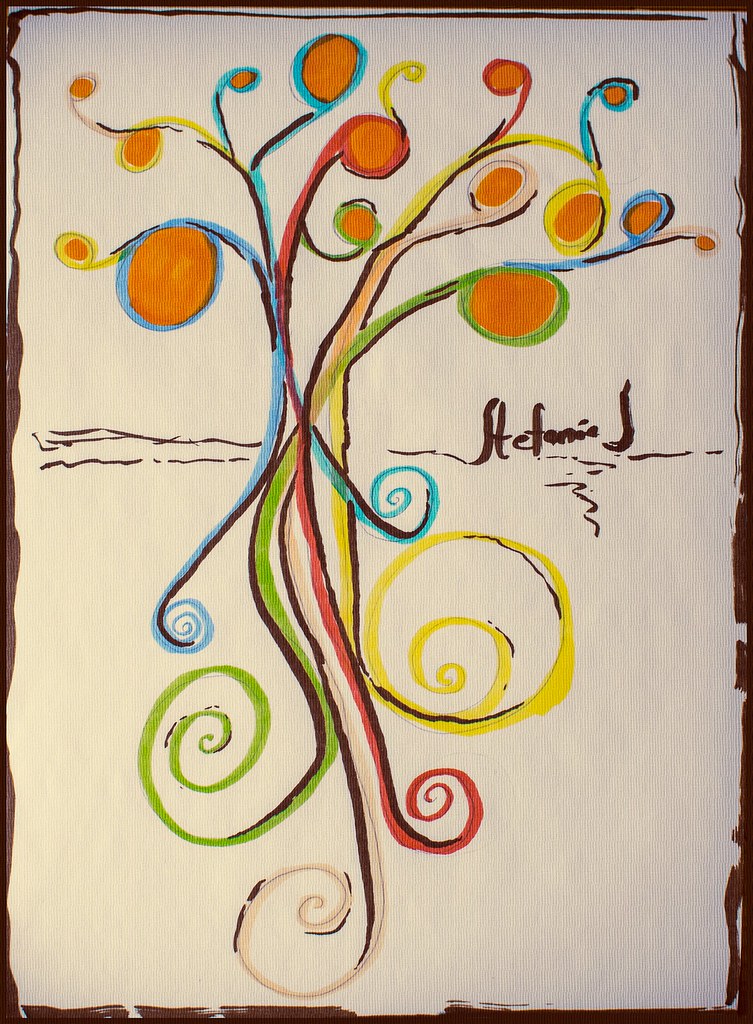
On the CyberARTS website, there's often links to various interesting websites that feature different types of technology, tips and tricks, challenges for artists to try, etc. One of the websites that's featured is called "The Daily Create". The website "The Daily Create" features different challenges for artists to try. Once someone has completed a challenge, they can upload a picture of their finished product to Flickr and tag it dailycreate and tdc1140. This weeks challenge is to create a picture of yourself as a tree/being represented as a tree. I found this challenge to be particularly interesting, this the idea of myself being an embodiment of a tree is quite unusual and unique. I also have an eccentricity for drawing trees-especially ones in high value-and I thought of doing a high value one myself, but instead with colour. I'm currently working on it, and I'll probably post it on my blog soon too. Down below is a few pictures of entries that people have made as well as the link to "The Daily Create"and the CyberARTS website too.Link to "The Daily Create":
http://tdc.ds106.us/
Link to the CyberARTS website to find more interesting artistic websites and such:
http://lcicyberarts.blogspot.ca/

Seen to the left is a picture that someone created and was featured on "The Daily Create".
Seen to the left is a picture that someone created and was featured on "The Daily Create".
Friday, 13 February 2015
CyberARTS Weekly blog post #2
Artistic inspiration
Recently I had been searching for inspiring and/or interesting websites that showcase artist's work that I thought would be notable enough for me to write my weekly blog post on, while at the same time having some kind of impact on the way I think. The website is an art gallery-styled homepage for the user to view the works of Steven Dufala and Billy Blaise Dufala- AKA the "Dufala Brothers". On the website, there are three sections of different types of art that is categorized: Sculpture, On Paper, and Projects.The works that are displayed are all very unique- I feel as if their purpose was to make the viewer see an ordinary object from a different point of view. Seeing the works from these two brothers encouraged me to get in touch with my inner quirky side as an artist.
Seen below is a couple of pieces that I personally picked out. In my opinion, the most interesting piece that I found on the website would be one of a project that the brothers constructed to create a large-scale army tank out of cardboard. Once it was created, it was sent out onto the streets and was shown to be a very "unique" way of transportation. In conclusion, this was a very interesting website that I came across, and I find the perspective of the artist's to be very different-as if it were a breath of fresh air.
Below with the pictures is the link to the website, a link that shows fives "inspirational artistic websites", and the video of the cardboard tank.

Seen to the left is "3-D machine", watercolour made in 2011
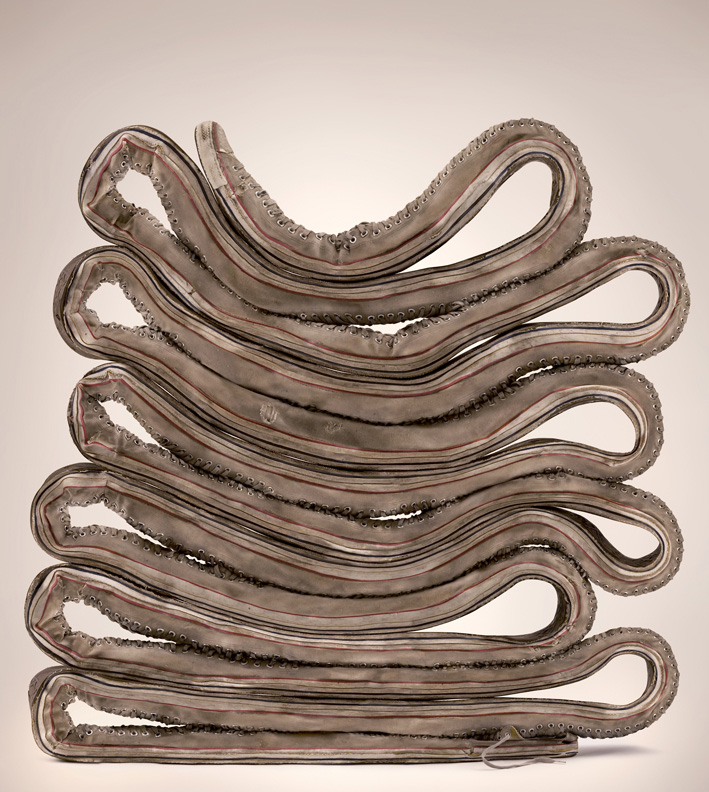
Seen to the left is "extra long chuck", digital made in 2010
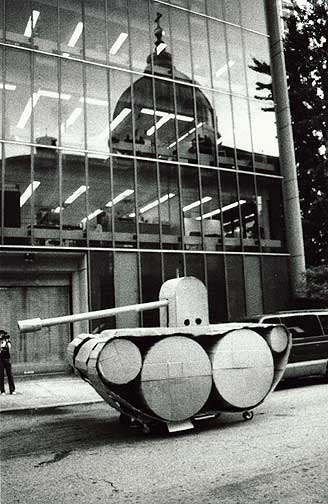
Seen to the left is "cardboard tank" , photo credit - pete danz
Link to the website that shows five different "inspirational artistic websites"
http://www.creativebloq.com/web-design/artist-websites-10135048
Link to the website that I accessed to find these pieces as well as the video.
http://dufalabrothers.com/cardboard_tank.php
Video of the cardboard tank in all its glory.
Wednesday, 11 February 2015
Filter Experimentation
Filter Experimentation
In Adobe Photoshop CS6, I began to experiment with changing and altering the appearance of backgrounds using the varied filters found under the"Filter" tab in the top-left corner of the screen. Here are the filters that I used and in order as well:
- Oil paint
- Add noise
- Blur (then "field blur" selected from that tab)
- Render (then "lens flare" selected from that tab)
- Lens correction
Here's the original photo and the one that I photoshopped using the varied filters.

Seen to the left is the original photo of the background.

Seen to the left is the photoshopped photo of the background that I edited using varied filters.
In conclusion, I've always enjoyed editing and experimenting with varied filters on photos in Adobe Photoshop CS6, and this was definitely a fun little photoshop edit to brew up too. I definitely recommend playing around with varied filters in a person's spare time-it's quite interesting and delightful!
Monday, 9 February 2015
Scratch art text image
Scratch art text image
In Adobe Photoshop CS6, I learned how to create a scratch art styled image of text. I also wrote a mini tutorial of how I created this image. Here's a picture of the image I created below.

Step 1: I dragged the desired background into an Adobe Photoshop CS6 file. I then removed the background lock on the image and resized the canvas using "Canvas size", and then resized the image itself by clicking "Free transform" so it would fit on the canvas.
Step 2: After selecting an image and resizing it, I created a second layer and filled it with white paint using the "Paint bucket tool".
Step 3: After creating a second layer and filling it with white paint, I selected the "Horizontal type mask tool" and selected onto the image to write in "Thug Life". Afterwards I changed the font to "Stencil Std" and changed the font size to 95 pt.
Step 4: Once I added in the text, I selected the "Eraser tool" and changed the eraser size to 2. I then zoomed in using the "Zoom tool", and began to erase on an angle while making sure to leave small gaps in-between the eraser strokes as well.
Step 5: After I finished creating my desire image, I selected "Save as" and saved the image twice- once as a Psd, the other as a JPEG.
In conclusion, this was a very interesting assignment to say the least. I got to experiment with finding out how certain backgrounds would look with different types of text, and I got to learn an interesting photoshop tip as well. Overall I'd say that this was a very interesting lesson on photoshop.
Friday, 6 February 2015
CyberARTS weekly blog posting #1
Life Observation
During the last week of January of 2015, right as first semester at Lakeshore Collegiate Institute was coming to a close, I was given a week off from classes due to final examinations being finished. During that time, I re-kindled my love for various hobbies (drawing, organizing, cleaning, etc). One of my hobbies is playing video games in fact (especially the story and adventuring-based ones). During this allotted 7 days of break from examinations, I experimented with trying out different "Life's" in a game I play on my Nintendo 3DS called "Fantasy Life". The game "Fantasy Life" is an adventure RPG-styled game that allows the player to switch between different "Life's" as often as they want. Each "Life" has a certain skill and/or power that they specify in (Mining, Alchemy, using a certain and/or specific weapon, etc).I first started out as a Paladin (Paladin's serve and work under the rule of the king, as his own personal type of protection. They specify in using longswords and shields. They have high defense and hp), then I moved onto a Blacksmith (Blacksmith's forge weapons using ingots that they create from melting down different types of metals and materials such as iron, gold, silver, etc. Blacksmith's have high attack, defense, and vitality), then I started "Life" as a Woodcutter (Woodcutters use their axes to chop down trees that are used in carpentry. Woodcutters have high attack, hp, and dexterity), then shortly afterwards I started "Life" as a Miner (Miner's mine precious materials such as various stones and metals that can be sold or can be used in various alchemy experiments, in a blacksmith's forge, in carpentry, etc. Miners have high attack, hp, and vitality), and afterwards I tried out the Alchemist "Life" (Alchemist's use varied materials to concoct potions, elixirs, charms, etc. Alchemist's have high special attack, and dexterity), and recently I tried out the Carpenter's "Life" (Carpenters use wood to create furniture and turn logs into beams which can be used to create furniture as well. Carpenter's have high attack and dexterity).
Whenever the player starts out a new "Life" for the first time, they go through an introductory quest and get to know their "Life Master" as well. A "Life Master" is the character that generally helps guide the player and sends them off on a tutorial that includes a small story to it that involves the "Life Master" also. The "Life Master" generally is a quirky character that is the best in whatever "Life" it is that the user wants to currently pursue. The user also returns to the "Life Master" whenever they complete a quest (a quest is similar to a challenge or an assignment in a sense. Once the user completes a challenge, they are rewarded with points. The only way to progress and raise the ranking of that "Life" higher is by completing quests) and want to know how many points they've received from such quest. The "Life Master" also can talk and give hints to the user about varied tips and tricks on how to thrive while being in such a "Life" as well.
When I started my "Life" as a Carpenter, I figured that the "Life Master" would be a regular, typical, confident and well-composed type of guy. What I figured was wrong, in a way that is. The "Life Master" for the Carpenter is named "Woody" (figures, doesn't it?). Woody is an absolute master at his craft (from what I've heard, that is). He seems to be the best of the best-afterall he is the "Life Master" for all Carpenter's to see. Upon immediate interaction with Woody, the player can obviously tell that he is rather nervous, timid, and isn't good with being put on the spot. In fact, he's so nervous that he often times says things that don't quite make sense. The first conversation that you have with Woody is his own description of what he feels that carpentry is. The old saying "life is a lot like a box of chocolates, you never know what your gonna get" reminds me of this- in a way that is. The way that he jumbles his speech and takes a spin on an old saying that relates to life and how the game "Fantasy Life" revolves around the user choosing a "Life" really reminded me of that. I generally enjoy humour that comes from odd places and speech being twisted with puns being made as well, such as "Corner Gas", a Canadian television show that includes such witty-humour. Seeing this conversation really made my day, and inspired me to think a little bit differently.
Below is some snapshots that I took using a camera of the first conversation that the player has with Woody.

Seen to the left is the first picture from the conversation about carpentry.

Seen to the left is the second picture from the conversation about carpentry.
Thursday, 5 February 2015
Stephen Harper edited picture for Rick Mercer photo challenge
Stephen Harper edited picture for Rick Mercer photo challenge
In CyberARTS, we watched a video that went over different types of text enabling techniques in Adobe Photoshop CS6. We were then introduced to the "Rick Mercer photo challenge", which is a challenge featured on the Rick Mercer website. The challenge that the website poses is for the photoshopper to create a photoshopped image of a politician. The politician selected this time was none other than Canada's Prime Minister, Stephen Harper. For this assignment, I chose to depict Stephen Harper with a golden frame around him containing hot-pink text saying "Stephen Harper=hardcore Brony", while the background being that of a "My Little Pony" scene with various ponies being seen as well. Below is the instructional guide that I've created to show the steps that I took to create this image.

Seen above is the photoshopped image of Stephen Harper that I created.
Step 1: Once having the image of Stephen Harper opened in an Adobe Photoshop CS6 file, I then used the quick-selection tool to select Stephen Harper. I then used refine edge to clean up the bits and pieces of the background in the image. Afterwards I selected "decontaminate colours" from the output section from the refine edge bar, and then chose "New Layer with Layer mask".
Step 2: After having Stephen Harper selected out of his background, I dragged a background into Photoshop of my choice- a "My Little Pony" picture. Once the new tab that contained the background was displayed, I went back to the tab that contained Stephen Harper, and I clicked on the "Move Tool", then command-clicked on the layer mask, then onto the regular photo of him on the left from the same layer. I then dragged the image of his body onto the background layer.
Step 3: After having Stephen Harper being placed onto the background, I picked an image of a golden frame for Stephen Harper to hold. I dragged the image of the frame into Photoshop, and I then repeated step 1 and 2 for the frame. I then dragged the frame onto the tab that Stephen Harper was on.
Step 4: The final step I took was creating the text. I selected the Horizontal type tool and moused over the upper-edge of the bottom half of the frame. I clicked on the area and began to type my desired message. Afterwards I selected the font from the top of the screens text bar, increased the font size, and set the font colour.
Step 5: After I finished photoshopping my image, I selected "save as" and saved my image twice- once as a psd file, the other as a jpeg.
In conclusion, the assignment was very interesting (you don't get to photoshop the Prime Minister of Canada everyday), and I found the tips and tricks that I learned on how to control and use the text tool from Adobe Photoshop CS6 to be very intuitive and inspiring.
Subscribe to:
Posts (Atom)